Sunday, December 23, 2012

A Post Stolen From Dearest Emily Over At Emily's Chronicles (http://eklobb.blogspot.com/)

Hello everyone! July here again and I'm so glad that I've gotten four entries for the "contest" we were having. If you missed that, click HERE to read about it. 

So I'm sure you're all wondering about the title but wonder no more! I was browsing Emily's blog (http://eklobb.blogspot.com/) and I stumbled across this adorable piece of Christmas cheer! I asked Emily if I could snatch her post and stick it on this blog (with all credit going to her of course) and she said yes, so here it is! But she did have one condition: a spike in her followers! So go and follow her, also if you could tell her that July sent you, that would be great :) 
Anyway, thank you Emily of Emily's Chronicles! Is that enough advertising to help get you a follower boom? :D

You will need
~White card
~Four different patterned/textured papers
~A set of compasses or circular objects to draw around - you'll need one large, one medium and one small.
~Scissors
~Pretty things with which to decorate said patterned papers - as I was posting this I was limited to ribbon, lace and thread but if you're able you can use beads and sequins.
~Strong glue with which to stick down said pretty things - I used UHU but you may need PVA or a hot glue gun depending on what you're using. Adhesive pads also work well in some cases.
~Sellotape
~Black filigree paper - if you don't have this then you'll need black paper and a hole punch
~A glue stick
~A black fineliner pen
~A ruler

Instructions

1. Take your patterned papers and cut out four circles, one large, one medium and two small.
2. Start decorating! With ribbon/thread, squeeze a thin line of glue where you're placing it and stick it down...
...then tape it at the back. 
You get the idea...
...don't you?
Unnecessary pictures...
...tralala ^_^
See! You now have some pretty circle - or baubles, as we can now call them! I only decorated three because I wanted to leave the pretty patterned one.
3. Now cut a strip of black filigree paper - if you have none then just cut a normal strip with a scalloped edge and punch some holes in it.
4. Now comes the bit where you require ninja-like skills and precision.  Lay your strip of paper and your baubles on the piece of card and make small pencil marks at the top of each bauble and at the bottom of the strip of paper directly above the top of the bauble...if that makes sense. Draw on strings and hanger-thingies in black fineliner pen. 
5. Then...stick everything on! Pretty, riiight?!?!
6. At the bottom, in an amazingly brilliant font, write Merry Christmas.
TA-DAAAAA!!!! Is it not lovely? :D :D
Oh, and if you're super-cool like me, you can draw a puppy in a Christmas hat inside the card.

Monday, December 10, 2012

Need Your Help!

Hey Creative Cliquers! I, being July that is, need you to send me your favorite Christmas recipes to post on this blog! I'll pick one or two to actually make and review.....
I really need your help and I think this could be fun but the only way it will work is if you send me an email.
My email is julya.emmance@gmail.com and I'll be checking my inbox regularly for your favorite recipe.
I'm not going to set a date limit now, but ASAP please!
~July

Monday, December 3, 2012

Snowflake Cookies

Well hello there fine readers and fellow crafters! So tonight, since its now December, I thought I'd start posting Christmas recipes! 
~July
*Enjoy the cookies and please note that the recipe is from tasteofhome.com

Ingredients

  • 2 cups butter, softened
  • 1-1/4 cups Imperial sugar
  • 1 teaspoon vanilla extract
  • 4 cups cake flour
  • 2 tablespoons edible glitter

Directions

  • In a large bowl, cream butter and 1 cup sugar until light and fluffy. Beat in vanilla. Gradually add flour and mix well. Divide in half. Cover and refrigerate for 2 hours or until easy to handle.
  • On a lightly floured surface, roll out one portion of dough to 1/4-in. thickness. Cut with a floured 4-in. snowflake-shaped cookie cutter. Place 1 in. apart on ungreased baking sheets.
  • Bake at 300° for 8-10 minutes or until firm. Repeat with remaining dough. Chill and reroll scraps if desired.
  • In a small resealable plastic bag, combine edible glitter and remaining sugar. Seal bag; crush mixture to break glitter into smaller pieces. Sprinkle over warm cookies. Cool for 5 minutes before removing to wire racks to cool completely

Monday, November 19, 2012

Thanksgiving Turkeys!

Hey everyone! It's July and as all our American followers know, we are celebrating Thanksgiving this Thursday. For those of you how don't know what that is, Google it because I don't have time to explain right now :) 
Most people have turkey on Thanksgiving, but I do know a few oddballs who have ham instead. But today in honor or our Thanksgiving Turkey, here is the cutest recipe that I made with my four year old cousin last year! Very easy to make!

All you need is-
~Frosting to act like glue
~Candy corn for the beak and feathers
~Oreo cookies for the body
~Tootsie Roll for more of the body
~Malted milk ball for the head
~and optional colored frosting for the eyes and gobble

I'll let the picture explain, I think you can figure it out!
*Thanks to delish.com for the picture

Happy times,
July

Wednesday, October 31, 2012

Happy Halloween/Reformation Day/Day of the Dead, Whatever you wanna call it!

Fun Caramel Apples RecipeHello! It's October 31 which means that it's Halloween here where I live... I don't know if that is different in other countries, but oh well. 
So most people celebrate Halloween as a day to dress up in costumes and go trick or treating for candy. That is what I do, but also Christians celebrate it as Reformation Day where Martin Luther King nailed 100 reasons why the  Catholic church was wrong on the door of the church (I'm sorry if you are Catholic and this offends you). Also, in Mexico, either today or tomorrow is when they celebrate the Day of the Dead where they honor their dead loved ones and remember the impact their late loved ones had on their lives. 
What other things do you call or celebrate on Halloween? Just curious!
Anyway I'm sure you're all bored of reading that and want me to get on with it to today's recipe! Well here goes! Enjoy making your Fun Caramel Apples!


*Thanks to http://www.tasteofhome.com/ for the recipe

Ingredients

  • 1 package (11-1/2 ounces) milk chocolate chips
  • 2 tablespoons shortening
  • 1 package (14 ounces) vibrant green Wilton candy melts
  • 1 package (14 ounces) white Wilton candy melts
  • 2 packages (14 ounces eachWerther's Original Chewy Caramels
  • 1/4 cup water
  • 8 large tart apples, room temperature
  • 8 lollipop sticks
  • Assorted candies such as jimmies, M&M's and Reese's Pieces

Directions

  • In a microwave-safe bowl, melt chocolate chips and shortening; stir until smooth and set aside. In another microwave-safe bowl, microwave melt the green candy melts. Repeat with white candy melts.
  • In another microwave-safe bowl, microwave the caramels and water, uncovered, on high for 1 minute; stir. Heat 30-45 seconds longer or until caramels are melted; stir until smooth.
  • Line a baking sheet with waxed paper and grease the paper; set aside. Wash and thoroughly dry apples. Insert a stick into each; dip into caramel mixture, turning to coat. Place on prepared pan. Drizzle with melted chocolate and candy melts. Decorate as desired with melted chocolate, candy melts and candies. Refrigerate until set.

Yummy yum! 
~July


Saturday, October 20, 2012

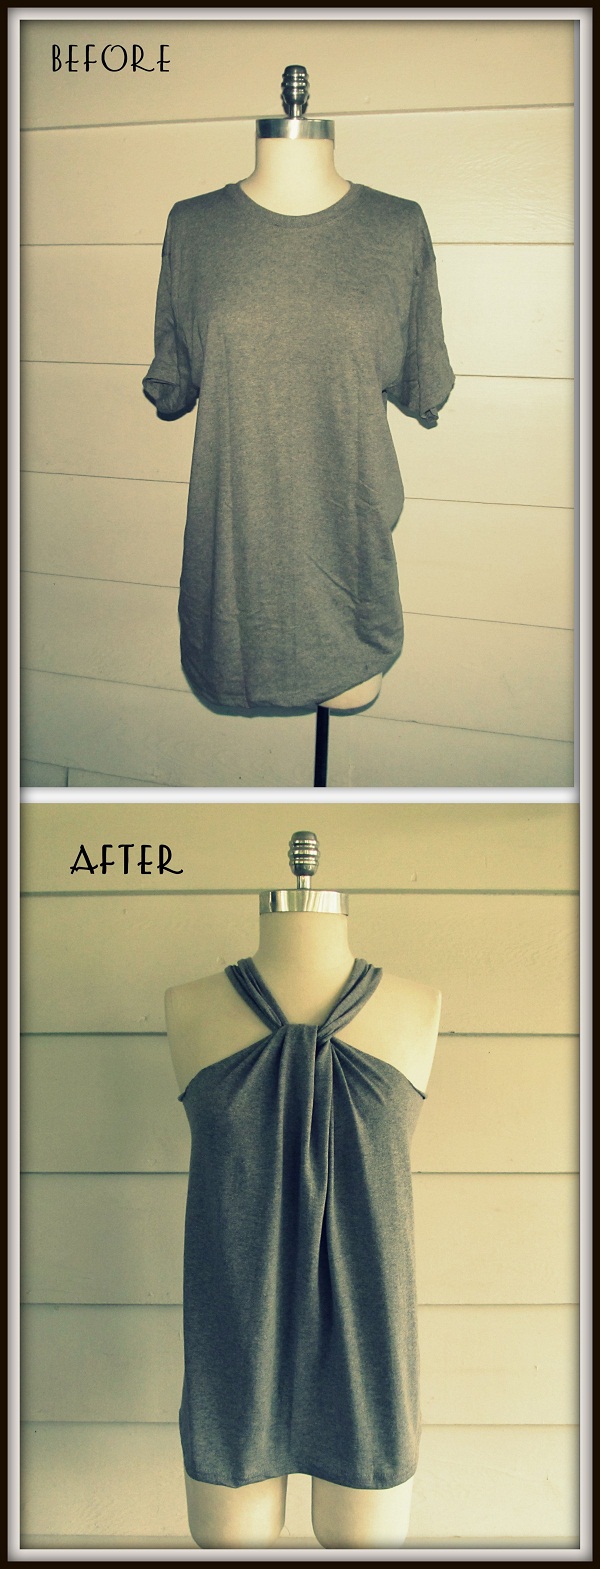
Halter Tank Top

An easy no-sew tutorial to change an old T-shirt into a gorgeous tank top.


 Tutorial
 Things You Need.
  1.  Tee-Shirt~ mine is a mens medium
  2. Scissors
  3. Chalk
Front 
 Cut where the red lines are.


 The back 
 cut the red lines


Back
 Cut down the middle of the back cut out..


 Front after cutting
NOTE* you cut one continuous line from the front to the back. 
Back After cutting

 now tie the front
 wrap around your neck 
and tie to the two straps in the back.
.


 If you want to trim off the excess off the straps.
 I am leaving mine so I can play and change it up some more..
or tie them into a bow.


Cheers,
<3 Seana

Wednesday, October 17, 2012

Butterbeer Latte!

Hello! Julyabelle here.
So today, since it's getting to be cooler weather out, I am gonna share with you one of the most amazing drinks of all time. My friend Evelyn shared it with me because she know's how big of a Harry Potter fan I am! Thanks Eve!
* Just a side note, this doesn't have any actual beer in it!


So for all you HP fans out there (or those of you who are just curious) ENJOY! and happy hippogriffs!
July

Wednesday, October 10, 2012

Spongebob nails


Whaddya need?
- Assorted nail polish colors
- Patience
- Time

Have fun trying out these nails! If you end up doing them, feel free to send myself or July a picture!
<3 Sea

Sunday, October 7, 2012

Eggnog Latte

Hey guys! So here's another warm fall drink to make! 
*Thanks to http://www.mnn.com/ for the recipe

eggnog latte in a mug 
Ingredients
• 1/3 cup 2% milk
• 2/3 cup eggnog
• Nutmeg (optional)
Directions
1. Pour milk and eggnog into a pan and heat up, being careful not to burn it because milk burns easily
2. Pour the steamed milk and eggnog into the mug, using a spoon to hold back the foam. Spoon foam over the top. Sprinkle ground nutmeg (or grind fresh nutmeg yourself) on top of the foam. Serves one.

Have fun making this! Please note that I had to modify the recipe a bit because it contained alcohol, and we can't have you drinking that! :)
July

Saturday, October 6, 2012

Pumpkin Pie Smoothie


Hello! So today in Sea and I's little town, we are celebrating Pumpkin Festival and we're marching in the parade with our school's band. Anyway, on the recipe!
* Thanks to http://www.mnn.com/
pumpkin pie smoothie in a glass

Ingredients
• 1 15-ounce can pumpkin (chilled)
• 1 12-ounce can evaporated milk (chilled)
• 8 ounces vanilla yogurt
• 1/4 cup sugar
• 1/2 teaspoon pumpkin pie spice
• Whipped cream, to taste (optional)
 
Directions
1. Combine pumpkin, milk, yogurt, sugar and spice in a blender; cover.
2. Blend until mixture is smooth.
3. Pour into glasses; top with whipped cream (if desired) and an additional sprinkle of pumpkin pie spice. Serves four.


I think this looks very good, even though it sounds gross... anyway have fun! And if you have any fall recipes to share, email them to julya.emmance@gmail.com 
and we'll get them posted with credit to you!
July