Wednesday, December 25, 2013

Merry Christmas!


From July and I, we wish you all the merriest of Christmases! Hope your day is filled with wonderful Christmasy food, family time, and all the happiness in the world!

Love,
♡ Seana & July


Tuesday, December 10, 2013

Winter Recipe Poll!

Hello everyone! I'm still very sorry about our last recipe thing that I promised to make, but this time, I promise I WILL get around to it since I'm done with musical, NaNo's over, and we have a little something called CHRISTMAS BREAK coming up.

Well, I need your help again to vote for the winter recipe that you want me to make, review, and share the instructions for.
Here are your options!


Three Broomsticks' Butterbeer (a different and more accurate recipe than what I've posted before)


Eggnog Fudge 


Eggnog Milkshake (erm.... not the spiked kind.... who do you think we are??? ;) heehee)


Peppermint Chocolate Marshmallows

And there you have it, folks. Please, please vote on which one you want me to make! And don't worry, I checked all the recipes this time so I will be able to make whichever one you choose :)

Love ya,
July

Sunday, December 8, 2013

Fall Recipe Poll- Pumpkin Chai Cupcakes


Hey everyone! Welcome to the results of the Fall Recipe Poll. I am sooo, sooo sorry that I didn't get this post up sooner, and even sorrier that I never had a chance to make these! 
Technically, the carmel apple shake won, but I made the huge mistake of not checking out the recipe beforehand and some of the ingredients were things that you can only buy online or in health food stores. I didn't want to get into that because I would probably only make the shake once or twice. Therefore, you guys get the recipe of the Chai Latte Cupcakes. 
I love chai tea lattes, so I'm hoping that when I do actually get the chance to make these, they will be just as yummy as I imagine!
In this recipe, you start with the basic cupcakes (which is below) and then you add other things to make the cupcakes chai, pumpkin chai, or vanilla chai. 
The Perfect Yellow Cupcake Recipe
  • 1 cup unsalted butter (I soften this up in the microwave first, after cutting this into cubes for easier mashing)
  • 2 cups sugar
  • 1 1/4 teaspoons vanilla extract
  • 4 eggs
  • 3 cups sifted cake flour
  • 1 tablespoon baking powder
  • 1/2 teaspoon salt
  • 1 cup milk (my secret: I use low fat goat’s milk which tastes like cream)
  • 2 tablespoons of either melted cream cheese or sour cream (really adds a lot of moisture!!!)
  • If this is all you want to do, scoop into your muffin papers/tins and bake at 350 for 20 25 minutes. You can freeze after they cool, if needed.
    Now, onto the fun stuff:
    Chai Latte Cupcakes
    What you will do is bring 1 cup of water to boil and place two black tea bags (does not matter if it is decaffeinated, in fact I often make it without caffeine because I have a lot of friends who don’t like caffeine) in the water. Let it boil for about 2 minutes, then reduce to a simmer and let it simmer for about 20 minutes, or until it reduces to 1/3 a cup of water. You’ll add HALF of that to your basic batter. Then you will add the following spices:
    * 2 tablespoons Cinnamon
    * 1 teaspoon ground ginger
    * 1 teaspoon nutmeg
    * 1 teaspoon black pepper
    * 1 teaspoon cloves
    I almost always add MORE spices than that, but I am giving you the minimum because I know that people have different tastes than me, so just taste your batter and adjust accordingly.
    The frosting for this should be a buttercream frosting with the addition of 1/2 a teaspoon of cinnamon.
    Vanilla Chai Latte Cupcakes
    Simply add an extra 1/2 teaspoon to vanilla to the batter and when making the buttercream frosting add 1/4 teaspoon vanilla and then sprinkle each cupcake with a little cinnamon.
    Pumpkin Chai Latte Cupcakes
    To the Chai Latte cupcake batter, mix in 1 cup of NON SPICED pumpkin puree. If you have only pre-spiced pumpkin puree, please adjust your spices accordingly.
    Frost these with a cream cheese/butter frosting with 1/4 teaspoon of vanilla mixed in.
    And since it is the season, a generous topping crunchy orange sugar sprinkles is always super nice!

    Monday, November 25, 2013

    Winter Is Coming (A Side Updo Tutorial)

    Living in the north of the US means one thing: We get snow. And just this weekend we got some snow, and it was one of the most gorgeous things I've seen in a while. With winter already around the corner (or for some of us, it's already here), and that means it's time to break out the cozy sweaters and delicious peppermint goodies.

    And some of you will definitely have some Christmas, New Years, and other holiday parties that go along with winter. Struggling to find a hairstyle to go with your outfit? I've found a tutorial that's perfect for any occasion and looks adorable.


    Happy winter!
    ♡ Seana

    Monday, October 21, 2013

    Triple Headband Braid Twist

    Hello, lovelies! Apologies for the absence of new posts, but I've got my hands full with schoolwork and other crazy things that come along with being in high school. (: But now I'm going to share with you a gorgeous hairstyle that's essentially just three headband braids and a little poof.


    Necessities:
    - Hairbrush
    - Rat tail comb (or any other teasing tool)
    - Elastic hair bands
    - Bobby pins
    - Hairspray (optional)

    Steps:
    *Brush out your hair so that there are no tangles and knots.*

    1.) Divide your hair as if you were going to create a half-up hairstyle. Tease that section of hair lightly, smoothing over the top to hide the teasing and making it look sleeker and not so gnarly.

    2.) Gently twist the teased section and pin it on the back of your head with bobby pins.

    3.) Divide the rest of your remaining hair into two parts.

    4.) Take a little section of hair (near your ear) from one of the two parts and braid it with a regular 3-strand braid.

    5.) Take that braid and drape it across your head like a headband, and pin it on the other side, hiding the end of the braid underneath a little bit of your hair.

    6.) Braid the two remaining sections, repeating the headband style that you did for the first one. Hide the ends and bobby pins underneath the other braids.

    7.) Finish with hairspray to set the look and tackle any tricky flyaways.

    Voila!

    Sunday, September 22, 2013

    Fall Recipe Poll!

    Hello! So I know I haven't posted in a while and my apologies for that! but with high school just starting and all.... you know, things can get a little hectic.
    Anyway, last winter I had you all send my recipes to try and review and I made White Peppermint Mocha drink! This fall I'm going to do something similar but you are going to vote on which fall themed recipe you want me to make, review, and share the recipe for! If Seana's on board maybe we can get together and she can help me not struggle so much, haha, because we all know how I am in the kitchen! Erm, remember the rock cookies? Just kidding. ;)

    So here are your options! Please, please vote on the poll I have set up on the righthand side of our blog!
    Love,
    July


    Caramel Apple Shake


    Mini Carmel Apples


    Pumpkin Chai Cupcakes

    Saturday, September 7, 2013

    Heatless Waves

    Perhaps you can tell that I'm kind of obsessed with ways to get my hair lovely and wavy without messing with curling irons, flat irons, and whatnot. So I found this tutorial by a YouTuber who has an easy method for heatless curls.

    SOURCE

    NOTE: If you don't have the hair clips she uses, bobby pins work just as well!

    Friday, September 6, 2013

    Chunky Beach Waves

    Hello one and all! I'm going to quickly apologize for my summer absence from The Creative Clique. Sorry. It was all I could do to keep up on my regular blogging schedule without this on top of it, but now that I've got my lovely laptop back, I think I'll be able to start my share of posts again. Huzzah!

    So. Beach waves. Here we go!

    SOURCE

    Tools:

    - Flat iron
    - Hairspray (optional)
    - Heat protectant spray (optional)

    Steps:

    OPTIONAL: Take your heat protectant spray and spritz it all over your hair to protect it from being singed off. Brush hair to distribute evenly.

    1.) Get your flat iron all heated up and then grab a chunk of hair (small, medium, or large, depending on how tight you want the waves).

    2.) Wrap that hair around one or two fingers, depending on how big you want your waves. Keep in mind that how big of a chunk of hair you take will also affect this.

    3.) Pull the loop of hair off of your fingers, making sure that the loop doesn't unravel. Flat iron the loop of hair.

    4.) Open the flat iron and release the hair.

    5.) Repeat on the rest of your hair.

    Refer to picture tutorial below if none of that made sense!


    Wednesday, August 21, 2013

    Braided Bun?

    Hey everyone! Summer is coming to a close and I guess I'm ready for high school but a bit nervous too.... Anyway, remember when I went to the 8th grade banquet? Well this is kind of what my hair looked like but not really.... Heehee. 
    It's a really pretty hair style though so try it!
    July


    Wednesday, August 14, 2013

    DIY Lampshade

    Hey! How are y'all? Here's a sweet lampshade that you can make all by yourself by just poking holes in a lampshade! What I think is cool about this is that you can do whatever design you want, but the skyline on this one is awesome :) I don't know about you, but I'm gonna make myself one ASAP!
    July


    Tuesday, August 6, 2013

    Ponytail Braid

    Hey! It's July :) Do you have any fun plans left for summer? I hope so! I thought this was very cute and pretty simple looking if you know how to French braid. If not, look it up on YouTube, there are some really good tutorials there for French braiding!
    July

    *source


    Monday, July 29, 2013

    IT'S MY BIRTHDAY! Mustache Cake

    HEY! It's my birthday today, I'm super excited! I'll tell you all about it sometime :) But in honor of this special day, today's recipe is mustache cake! I might just have to make this!
    July

    *source


    Wednesday, July 24, 2013

    Three Ingredient Nutella Cupcakes!


    I LOVE Nutella so how could I pass these cupcakes up?? 
    July
    Ingredients
    • 10 oz Nutella
    • 2 eggs
    • 10 oz flour
    Optional toppings – peanuts, hazelnuts, almonds…
    Method
    1. Preheat oven o 350F
    2. Mix the ingredients well in a bowl.
    3. Transfer to a muffin tray.
    4. Add your favorite toppings.
    5. Bake for about half an hour.
    6. Eat.

    Friday, July 19, 2013

    Queen's Braid

    Hola (hello)! Como estas (how are you)? This is a queen's braid and since there wasn't an explanation for it, I'll explain for you. 

    It's exactly like a French braid, except you only add hair from one side! Very simple and easy to do if you can French braid. Good luck!
    July

    *source: Pinterest


    Friday, July 12, 2013

    Ombre Knotted Bracelet

    Hello! How might all the cliquers be? How's summer? Anyway, here's a sweet bracelet that would look really cool with just about anything!
    July


    Saturday, July 6, 2013

    Hedgehog Cookies :)


    Heyyy! These are adorable so I thought I'd share :) 
    July

    *SOURCE


    You'll Need:

    • 1 cup butter or margarine, softened
    • 3/4 cup sugar
    • egg
    • 1/2 teaspoon vanilla extract
    • 2 1/2 cups all-purpose flour
    • 1 teaspoon baking powder
    • 1/4 teaspoon salt
    • Melted Chocolate chips
    • Crushed walnuts

    Directions

    1. In a mixing bowl, cream butter and sugar. Add egg and vanilla; mix well. Combine flour, baking powder and salt; add to creamed mixture and mix well.
    2. Form cookies (in an oval shape with a pointed end) and place 2" apart on on ungreased baking sheets. Bake at 375 degrees F for 6-8 minutes or until set but not brown. Cool on wire racks.
    3. Dip 3/4 of cookies in melted chocolate and then in crushed walnuts. Dot two eyes and a nose!

    Sunday, June 30, 2013

    Tie Dye Swimsuit Cover-Up


    Hello! It's July again and since it's summer, here's a cute swimsuit coverup that you can make by yourself!


    Before & After
    Supplies needed:
    A white t-shirt (I bought a large, and I usually wear a medium t-shirt)
    Tie Dye kit
    Needle & thread

    You can tie dye your shirt however you want, but if you want a spiral effect like mine, here are the steps!
    1. Pinch your shirt wherever you want the center of your swirl to be.
    2. Swirl your shirt around your pinch until it’s compact.
    3. Divide your shirt into 6 sections with 3 rubber bands.
    4. Squirt your dye in each section. Try not to overlap your colors.
    5. Place shirt in a plastic bag for about 8-14 hours.
    6. Rinse shirt in the bathtub.
    7. Wash your shirt by itself on hot in a large sized load.

    As for the braided racer back steps:
    (adapted from TheSorryGirls on Youtube)
    Lay your shirt out flat.
    1. Starting about 1 ½ inches below the bottom of your sleeve, cut one sleeve off of your shirt, creating a U-shape.
    2. Use your cut-off sleeve as a pattern to cut off your other sleeve. (Save those sleeves for later!)
    3. Flip your shirt over so the back is face-up. Cut the back sleeves of your shirt, making the holes bigger ONLY in the back, making a wide racer-back shape.
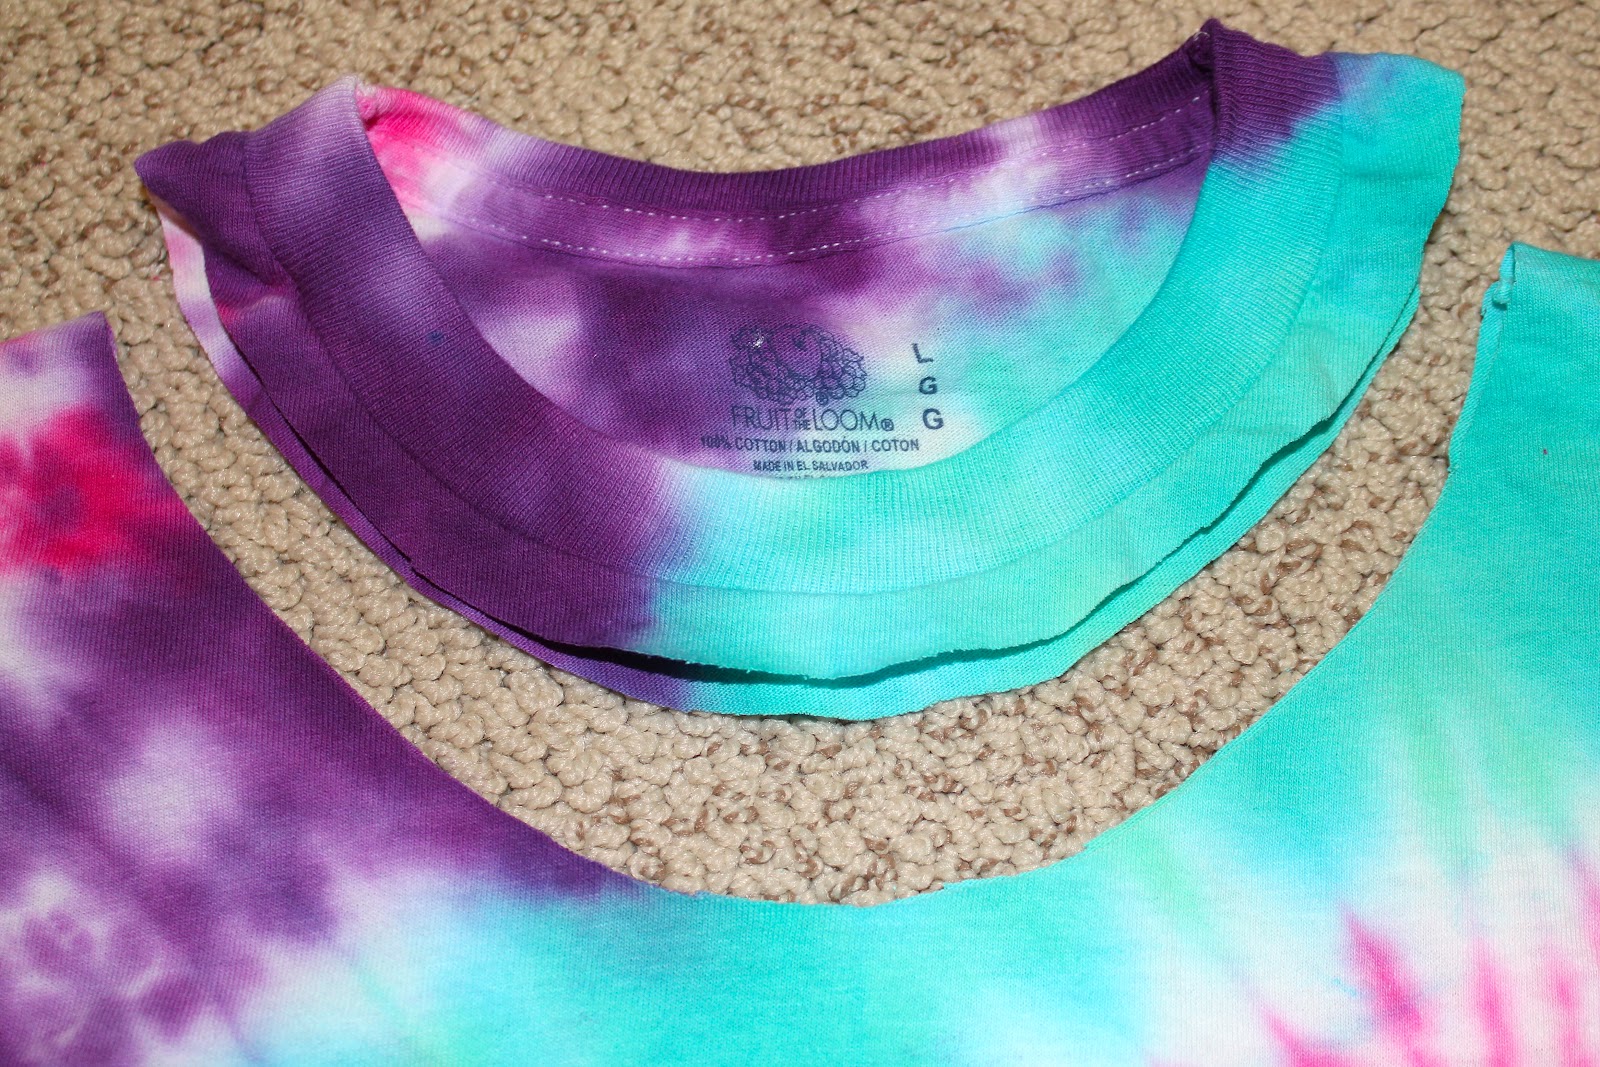
    4. Now, flip your shirt back over and cut off your collar. At first, I only cut about a 1-inch collar off, but I ended up cutting it more. So, I would recommend cutting about a 2-inch collar.
    5. Flip to the back of the shirt again. Cut a straight line right below your collar, cutting your racer back off.
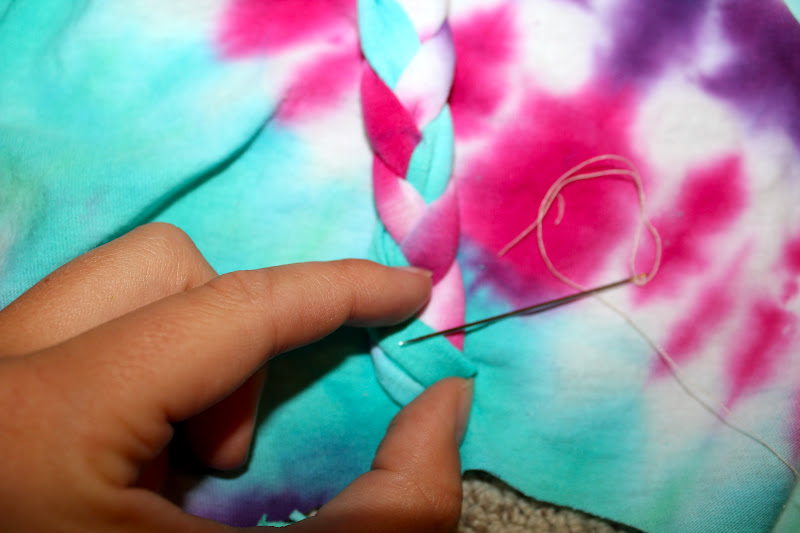
    6. Divide and cut your loose piece of racer back fabric into 3 strips. Tug on the strips to make them longer and easier to braid.
    7. Braid your 3 strips all the way to the top. Sew a few stitches at the end of your brad to hold it together.
    8. Now take your collar and fold it in half to find the center. Make a small mark where the center of your collar is.
    9. Make a few stitches connecting your braid to the center of your collar.
    10. Now cut a strip of fabric from one of your cut-off sleeves, about 1 ½ inches wide and 4 inches long. You can pull on both sides of it to make it longer.
    11. You’re going to use this fabric to cover your stitching. Stitch the end of the strip to the connection, and wrap it around covering your previous stitching. Connect your fabric at the end to complete your shirt!
    There you are- your own tie dye swimsuit cover-up!