Sunday, July 29, 2012

Rebel post: Happy Birthday!

Hey guys! I'm here in Colorado on my birthday today as you might know, so here's a sweet cake to make! Haha it rhymes!

Ingredients:
2 cakes baked in 1-quart Pyrex bowls
2 cakes baked in (12 oz) ovenproof glass bowls
2 Oreo cookies
5 banana Runts
1 can (16 oz) chocolate frosting
1 cup vanilla frosting
2 tablespoons mini-chocolate chips
2 Junior Mints
A serving platter
A chopstick or wooden dowel
A resealable sandwich-size plastic bag (Ziploc)

What you'll do:

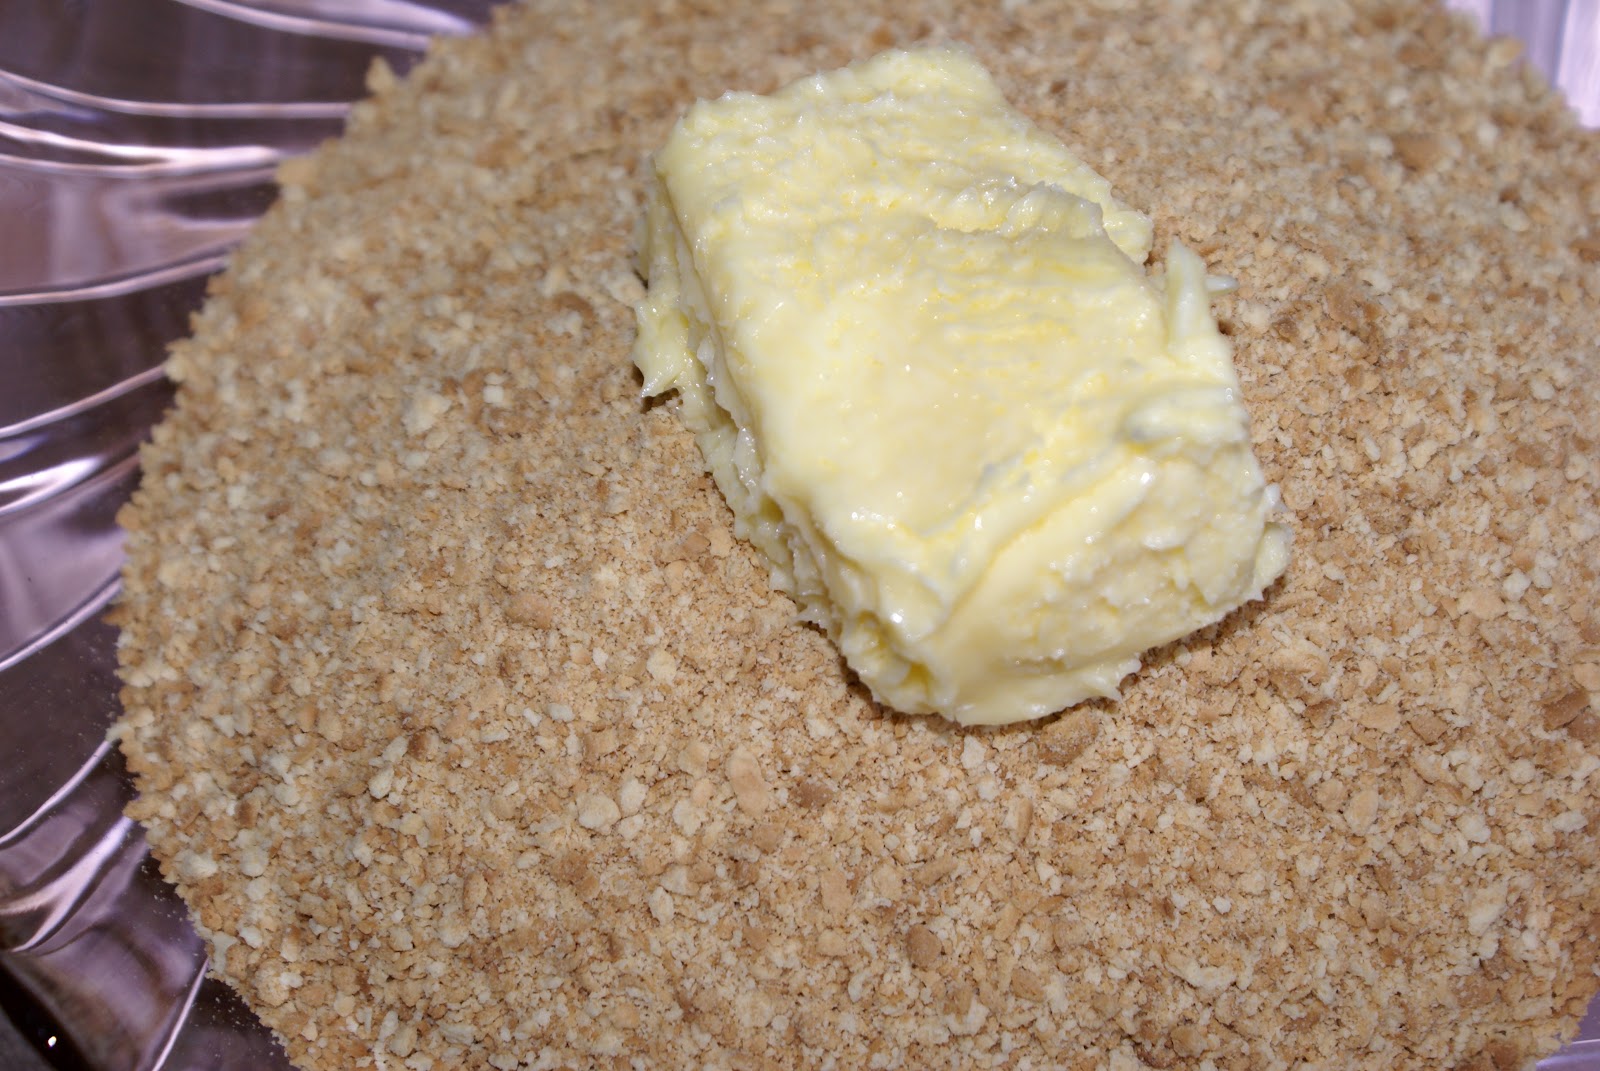
Trimming the cakes: Trim the top side of all of the bowl cakes to make level. Trim ½ inch from the curved bottom of one (1-quart) cake and place it wide side up on a serving platter.

Spread the top of the cake with some of the chocolate frosting.

Place the other quart cake on top, flat side down to make a ball.

Repeat the trimming and assembling process with the 2 (12 oz) bowl cakes.

Spread some frosting on the top of the larger ball and place the smaller ball cake on top as the head.

Insert a chopstick or wooden dowel in the center to help balance the cakes

Frosting the cake: Spoon 1 Tbsp of the vanilla frosting into a resealable plastic bag. Spread the remaining vanilla frosting on the front of the larger ball cake for the owl's chest.

Make smooth.

Dot the chest with the mini-chocolate chips as seen in photo.

Separate the Oreo cookies, leaving the cream on one side of 2 cookies for the eyes.

Cut one of the cream-free Oreo cookies in half with a serrated knife to make the ears. Press the cut cookies into the top of the cake for the ears.

Spread the remaining chocolate frosting over the top, sides and cookie ears. Make the head area smooth.

Using the back of a spoon, lightly press against the chocolate frosting and pull to make feather-like peaks all over the body of the owl.

To complete the decoration: Snip a small corner from the bag with the vanilla frosting.

Pipe a dot of frosting on the head area and attach the cookies with cream for the eyes.

Pipe a dot of vanilla frosting on the cookies and add the mints as the pupils.

Insert one banana Runt below the eyes for the owl's beak.

Insert the remaining banana Runts into the bottom of the white chest area for the owl's feet.

Thursday, July 26, 2012

I'm A Very Bad Blogger D:

Apologies and teddy bears, my lovely readers. I've been so busy with volunteering at my church's VBS, I've hardly had time to come up with posts. Again, I'm so very sorry! D: I shall try to come up with a post for Friday, right on schedule, which should get me back on track.

<3 Seana

Saturday, July 21, 2012

Beaded Nails

Yo everybody, July here and today I decided to post a video that I found on Youtube. 

I think these are some pretty rockin nails, but I never have my nails done so I would not be able to do these. I would love to see pictures of your attempts though! Email them to
julya.emmance@gmail.com

Check out this video on YouTube:

http://www.youtube.com/watch?v=zcyLSaNEv4A&feature=youtube_gdata_player

Good luck with those!
Julya

Oh, and here's the video to of how to get it off, which is also very important!

Friday, July 20, 2012

We are one lovely blog!

Guess what, lovely readers? The Creative Clique has been honored to receive the One Lovely Blog award. Aww. Well now, let's follow the rules shall we?

1. You must thank the person who nominated you
2. You must tell 7 things about yourself
3. You must nominate 15 other blogs

Here we go!

Ahem.

THANK YOU HERMIONE!

1. I'm in a really bad mood.
2. I wish I had a snow cone
3. I saw July's cousin at the library today....it was scary
4. I'm still not in a good mood because I could not find the books I wanted. D:
5. I still want a snow cone.
6. I just realized that I haven't really told you anything about myself or July....
7. I really dislike garden gnomes...they give me the heebie-jeebies....

Now then.

I HEREBY NOMINATE EVERYONE WHO IS READING THIS POST! BWA HA HA HA! >:D

There. Once again, thank you Hermione for bestowing the award upon us! :D July and I thank you both.

<3 Seana & July

Thursday, July 19, 2012

Brown Sugar Smokies

What's up! It's July again and I've noticed that you've been a little quiet lately! Don't be afraid to speak up and share your opinions with us, Sea doesn't really bite, she just nibbles ;)
Do I'm in Colorado right now, well actually traveling to CO in my family's new car! Anyway, the recipe today is Brown Sugar Smokies! Obviously I didn't make the ones in the pic since I'm traveling, but my family absolutely loves these!

Here's what you'll need:

1 pound bacon
1 (16 oz) package mini smokie sausages
1 cup brown sugar

What you'll do:

1. Preheat oven to 350 degrees

2. Cut bacon into thirds and wrap each strip around a piece of bacon.

3. Skewer them onto toothpicks or skewers

4. Arrange the skewers on a baking sheet and sprinkle with brown sugar

5. Bake until bacon is crispy and brown sugar is melted

6. Enjoy!

Wednesday, July 18, 2012

Lovely Seashells

Basically I have no idea how to make this thing, but it looks simple enough, so let me lay it out in the way I would suppose you'd create it.

So. Onward!

Whaddya need:
- Those really big wood or Styrofoam letters you can buy at craft stores
- A hot glue gun
- An assortment of seashells

Now. Take the seashells and one at a time glue them onto the letters until the whole side is covered. You could also glue them onto the sides if you wanted to, but I'd advise you not to glue the back or else it will scratch the wall behind the letters.

<3 Seana

Monday, July 16, 2012

Coffee Slushee

Hey guys, it's July. Im not particularly find of coffee myself, but for those of you who are, I thought I'd give you a cold coffee treat for these hot summer days!

What you'll need for two servings:
1 Tbsp of instant coffee 
1 cup ice cubes
1/2 cup milk
2 Tbsp sugar
A blender

What you'll do:
1. Put all the ingredients in your blender

2. Blend until ice is crushed

3. Pour into two glasses and serve immediately!


I didn't try this recipe because as I said, I'm not very fond of coffee, but I'll probably end up making this for my dad at some point. He's a coffee drinker!
Enjoy!
July 

Hey guys! It's July again, I am writing this after I wrote the original post, but here's how my Coffee Slushee turned out! The one I made for my dad that is... 
As you can see, it didn't quite turn out like the picture. We think that's because we didn't have instant coffee on hand and my dad (he knows his coffees!) says that that kind of coffee dissolves and ours obviously didn't because you can still see the coffee grounds. So it didn't taste quite right either, or so my dad says, because the coffee we used wasn't right. Next time, I will be using actual instant coffee for this!

Saturday, July 14, 2012

Beautiful Vases

Hey everybody! It's July and I know that I've been really bad about posting, but I'll try to stick to my schedule now. If I miss a couple, don't freak out because I've been having a super busy summer and I don't exactly have a computer to post from. Anyway, here are some very simple gorgeous, professional vases that you can make!

What you'll need:
A glass vase
Rubber bands of various sizes
Craft spray that "etches" the glass

What you'll do:

1. Wrap the rubber bands around the glass where you want the stripes

2. Spray with the craft spray

3. Allow the spray to dry then take the rubber bands off

4. Go out to your flower garden, pick some flowers, and enjoy!

These are beautiful vases that could work for everything from Mother's Day gifts to the decorations of that party you're having!
Have fun and just a hint, don't drop the glass, not a good idea...
July

Friday, July 13, 2012

Lemonade Popsicles

I'm afraid I don't have a picture for you since I don't have any lemonade handy, but here we go!

Whaddaya need:
- Lemonade
- Plastic Cup(s)
- Popsicle stick
- Plastic Wrap

Pour the lemonade into the cup and secure plastic wrap over the top. Then simply stab a popsicle stick through the middle and put it in the freezer. Give the lemonade time to freeze and voila! LEMONADE POPSICLE!*

*You could replace the lemonade with any other juice.

Wednesday, July 11, 2012

Strawberry Tart


 Ingredients:
  • juice of 2 lemons
  • 1 can sweetened condensed milk
  • 1 package and a half of sugary  of crackers 
  • 3 tbsp (tablespoons) sugar
  • 250 g butter, melted
  • 5 eggs
  • lemon zest
  • fresh strawberries 
 

Preheated oven at 180ºC.

Chop the crackers, add the melted butterknead with your hands, cover withthe mixture the tart pan, and poke the bottom with a fork.In a bowl, pour the condensed milk, the lemon juice1 egg and 4 egg yolksstirring welluntil the mixture is smooth. Put it into the tart pan and take it to the oven for 30 minutes or until cooked and goldenRemove from the oven and let cool. Chop the strawberries and display them om top of the tart. Reserve in refrigerator until serving time.


Friday, July 6, 2012

A whole lot of pink

I do so love pink, but there is too much of a good thing. You'll see why as you scroll down. (I thought the guy with the pink floral shorts and the lady with the pink eyelashes were hilarious!)