Friday, June 29, 2012

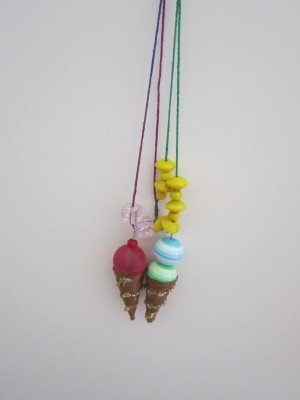
Ice Cream Cone Necklace

Now, before you worry that it's REAL ice cream, it's not. (: Just a craft in the shape of one, so don't fret! (A real one would get a tad drippy during summer's heat....) So this is a really cute craft to make, and it can also be a birthday gift idea for younger kids.


What you need:
Brown cardstock paper, craft glue, gold sparkles, round beads in pastel colors, small round red bead (optional), flat head pins, needle-nose pliers, string, extra beads (optional)

What you do:
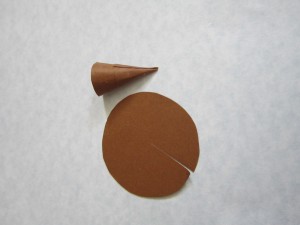
  1. Cut out a 1.5 inch circle from the brown cardstock. Make a slice halfway to the middle point, like this:
2. Starting at the cut, wrap the circle around to make a cone. Glue it as you do this.
3. Trim the top of the cone. Make a swirl of glue around the cone and dip the cone in gold sparkles, if you like.
4. Stick your flat-head pin through the base of the cone (the flat part should be at     the tip of the cone). Stick one or two beads on top of it.
5.Use the needle-nose pliers to make a loop at the top of the flat-head pin (you can get a grown up to help with this).
6.Put the ice cream cone on a piece of string and add extra beads, if you like.
7.Tie the two ends of the string together and slip the necklace over your head. Now you’re really ready for summer!

Wednesday, June 27, 2012

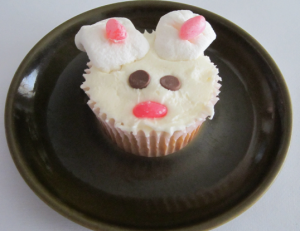
Bunny Cupcakes


What you need: Vanilla cupcakes, vanilla icing, small pink jellybeans, small chocolate chips, large marshmallows, pink gummy candy, rolling pin, icing sugar

What you do:
  1. Frost your cupcake with the white frosting.
  2. Near one edge of the cupcake, put the pink jellybean.
  3. Above it, place the two chocolate chips, points down.
  4. Cut your large marshmallows in half. One marshmallow makes two ears.
  5. Dust your counter and rolling pin with icing sugar. Roll out the marshmallow halves so they’re flat.
  6. Roll out the pink gummy candy. Cut it to look like a long pointed oval (this is the inside of your bunny’s ears). Stick the gummy candy onto the marshmallow ears.
  7. Stick the marshmallow ears onto your cupcake.
  8. Enjoy!
These are so adorable! I made a small batch of these a while ago, and they were as delicious as they look. Of course, I didn't eat the jellybean, but that's just because of my taste for pink jellybeans isn't really that high up. In other words, I don't like jellybeans. xD.
<3 Sea

Friday, June 22, 2012

Summertime Fruit Salad

Howdy ya'll! Sea here, and since it's summer, I've prepared a summertime recipe. Enjoy!


What you need:
-          3 peaches, sliced
-          3 bananas, peeled and sliced
-          1 pint strawberries, washed and halved
-          1 cup blueberries, washed
-          2 tablespoons pineapple juice
What you do:
Toss all the fruit together in a big bowl with the pineapple juice.
You can adapt this salad to your own tastes by substituting any of the ingredients with fruits of your choosing.

<3 Seana

Wednesday, June 20, 2012

Lemon Meringue Pie


When the heat begins to tighten there is nothing better for evening dessert, when a fresh breeze rises, than one (or twoscoops of ice creamaccompanied by a slice of pie with a crunchy crusta savory filling and sharply sour  lemon aftertaste, in a  meringue with a smooth creamy and irresistible texture- at least for me. It is very easy, do you want to try it?

Ingredients:
  • juice of 2 lemons
  • 1 can sweetened condensed milk
  • 1 packageand a half of sugary  of crackers 
  • 3 tbsp (tablespoons) sugar
  • 250 g butter, melted
  • 6 eggs
  • lemon zest

Preheated oven at 180ºC.

Chop the crackers, add the melted butterknead with your hands, cover withthe mixture the tart pan, and poke the bottom with a fork.In a bowl, pour the condensed milk, the lemon juice1 egg and 5 egg yolksstirring welluntil the mixture is smooth. Put it into the tart pan and take it to the oven for 30 minutes or until cooked and goldenRemove from the oven and let cool. Separately, beat the 5 egg whites with the remaining sugar and spread it over the cream  and take it  back to the oven to 200 º C till it has a golden look on top. Remove from oven, let cool completely and reserve in refrigerator until serving time.


Friday, June 15, 2012

Peanut Butter Dog Treats

I'm not sure if these are delicious, as I have yet to try them out for my puppy Chloe, but here is a recipe that the people who made these said was pretty tasty. Enjoy!
~Sea

Ingredients

  • 2 Cups flour
  • 1 Cup peanut butter
  • 1 Cup milk
  • 1 Tbsp. baking powder

Instructions

Add all ingredients. Mix dough with your hands until it forms a large ball.
Make little "meatballs" and then flatten slightly with the palms of your hands. (You could roll it out and use a dog bone cookie cutter, but I'm to lazy for that!)
Bake at 375° F for 20 minutes, then cool.
Your dogs will drool for them, and it's cheaper than buying dog treats. Feel free to double or triple the recipe!!

Wednesday, June 13, 2012

Sesame Butter Brittle

I just made this recipe a day or two ago, and it is FABULOUS!

Ingredients
4 ounces (1 stick) unsalted butter
1 cup sugar
3/4 cup white sesame seeds, toasted
1 teaspoon sea salt (Hawaiian or white)

Directions

In a medium saucepot over high heat, melt butter and sugar and stir to combine. Without stirring, cook until mixture becomes a light to medium caramel color, about 3-5 minutes, then add sesame seeds and stir in. Pour mixture onto a silpat* and spread into an even, thin layer, about 1/8 to /4-inch thick, with wooden spoon. (Don't worry if shape is irregular.) Immediately sprinkle sea salt over top of mixture and lightly press into caramel using spoon. Allow to set-up for about 10-15 minutes. When brittle has hardened and cooled, break into pieces and enjoy. Store in an air-tight container.
*If not using a silpat use a 1/2 sheet pan with parchment sprayed generously with cooking spray or wax paper

Monday, June 11, 2012

Spicy Green Salsa

Hello! This is July and here's a recipe to spice up your summer!

Ingredients

  • 8 tomatillos, husked
  • 3 shallots
  • 2 cloves garlic, peeled
  • 1 (4 ounce) can chopped green chile peppers
  • 1/4 cup chopped fresh cilantro
  • 1 fresh jalapeno pepper, seeded
  • salt to taste

Directions

  1. In a food processor, place tomatillos, shallots, garlic, green chile peppers, cilantro, jalapeno pepper and salt. Using the pulse setting, coarsely chop. Cover and chill in the refrigerator until serving.
Love, 
July

Saturday, June 9, 2012

Mockingjay Pin


Hey this is July! This is how to make your own Mockingjay Pin!

What You Need:
Polymer Clay (gold or white)
Gold paint (if you’re using white clay)
Crafting Wire
Wire cutters
Pin and pin back
Cutters
Super Glue
Air Dry glaze
Polymer clay tools
Paintbrush

Steps: 1. Bend the craft wire into three separate shapes for the mockingjay, arrow, and the ring that goes around. We’ll call this our ‘armature’ from now on. 
2. Cut two circles out of the clay that is big enough to cover the ring armature. One circle goes on
the back while the other on the front. When you put the two together over the ring armature you may have to gently smooth the edges inside and outside of the ring to give it a uniform look. Set it aside for now.
3. Now it’s time to work on the mockingjay. You’ll have the build up the clay around the mockingjay armature in steps. I did the body and the head first. Use some clay around the armature and use your fingers to shape and smooth out any imperfections. The tail and wings followed afterwards. To give the effect of feathers, use a tool to put in the impressions of the wings, as well as the eyes.
4. Now you’ll have the put the arrow armature into the beak of the mockingjay. Put some clay around the arrow armature. This can be difficult because of it being attached to the mockingjay. Do what you need to make it work for you. The tip and feathers on the end of the bow were added afterwards.
5. Now put the mockingjay and arrow in the circle that follows the design on the book. You will probably have to use little pieces of clay on the back to make the two pieces together.
6. Bake following your clay’s instructions. 
7. Now is the time to paint if you chose white clay. (Skip if you didn’t.) 
8. Now you can put your glaze one. This may take up to three coats to get the shine that you want.
Be patient and don’t touch the glaze when wet on your piece. I find using a blow-dryer (with
heat) helps speed up the drying process. 
9. Super glue your pin onto the back on the mockingjay. 
10. And you’re done! You’re officially part of the Revolution!

This is not my craft so I'm not sure how it would look. Try it and let me know! Happy summer,
July
Wednesday, June 6, 2012

Mango-Cheesecake Parfaits


HEY THIS IS JULY again and this is being weird and not letting me type caps.... I don't know what's going on....


Anyway, this is July taking over for Sea because she is too busy. Huh? Now it's letting me type in caps? Whatever.
Here is a great summer treat! Enjoy!


what you need

1
pkg. (8 oz.) PHILADELPHIA Cream Cheese, softened
1-1/2
cups cold milk
1
pkg. (3.4 oz.) JELL-O Vanilla Flavor Instant Pudding
1-1/2
cups thawed COOL WHIP Whipped Topping, divided
2
 mangos, peeled, seeded, chopped

make it


BEAT cream cheese in medium bowl with mixer until creamy. Gradually beat in milk. Add dry pudding mix; mix well. Whisk in 1 cup COOL WHIP.
LAYER half each of the mangos and pudding mixture in 8 parfait glasses. Repeat layers.
TOP with remaining COOL WHIP.

Sea and I wish you a great summer!
July

Saturday, June 2, 2012

Ocean Potion

This is such a simple, refreshing summer snack that's perfect for a beach party, end of school year party, or cute for an everyday snack! I LOVE this idea... please try this recipe!

Ingredients
  • blue gelatin
  • clear plastic glasses
  • gummy sea creatures
Instructions
  1. Before the party, whip up a batch of blue gelatin and pour it into clear plastic glasses. Put the gelatin in the refrigerator to set as directed on the package.
  2. At the party, guests can populate their Ocean Potion with edible sea critters 


    How cute right? Email me pics at 
    julya.emmance@gmail.com
    if you try this recipe! I want to see how yours turn out!
    Julyabelle

Friday, June 1, 2012

Two-Tone Nails

I've returned with yet another nail art idea. Here we have the Two-Tone Nails, which I am currently sporting on my own hands, but with my own twist that looks nothing like the picture.


Whaddya need:
- A whole lot of nail polish colors

Whaddya do:

Paint half of your nail one color, and the other half a different color. My added twist is to take yet another color and do a HORIZONTAL stripe near the top of the nail, but still leaving space above the stripe. You could do this with a different color combo on every nail (like I did) or you can keep it simple like the picture above. Let the polish dry and enjoy your beautiful nails! ;)

<3 Seana