Wednesday, May 30, 2012

Flowery Flip Flops

Since summer is on its way, bringing it's onslaught of heat waves, we can't be suffocating our little toes in shoes, now can we? No! So, here's a way to spruce up your old flip flops into something gorgeous.


Whaddya need:
- As many pairs of flip flops as you want to decorate
- Fake flowers
- Scissor
- Hot glue gun

First, take your fake flowers and cut off the stems, so that you're just left with the flower itself. Now, take your hot glue gun, after it's all nice and toasty, and glue the flower onto the part of the flip flop strap where the two sides meet, like in the picture above. Repeat the step on opposite flip flop. Repeat if necessary for other flip flops you are making. Voila! Cuteness on a shoe!

<3 Seana

Monday, May 28, 2012

Red, White, and Blue chocolate dipped strawberries

Happy Memorial Day! July here and this is a patriotic recipe for you to make!                                                              Here is what you'll need: 
  • 1 pint fresh strawberries (approx 12 oz)
  • 4-oz white chocolate
  • Blue sprinkles

Here is what you'll do:
  • Line a baking sheet or cutting board with wax paper or parchment paper.
  • Chop up the chocolate roughly with a knife if it is in block form. In a medium-sized, microwave safe bowl, melt the chocolate in the microwave. Heat it in 45 or 60-second intervals, stirring between each time to ensure that the chocolate is melting evenly and not burning. Meanwhile, place blue sanding sugar into a small bowl and set it aside.
  • When chocolate is smooth, dip the berries 3/4 of the way into the chocolate, dip the tips into the blue sprinkles, and place on wax paper.
  • Berries can set at room temperature if you live somewhere cool, otherwise refrigerate them until ready to serve to allow the chocolate to set up. Best within day or two of making.
  • And, don't forget to set a tin aside to share with your grandparents or anybody else who has served for our country!
Ah, And I'm sure you're all wondering about the new thing I'll be featuring on this blog! Well I'm pleased to announce that I will be sharing your recipes on our blog! Email 
julya.emmance@gmail.com
with your recipe (name, list of ingredients, either step by step pictures and/or finished product picture) and I'll post about it! Thanks so much and I can't wait to see what you can "cook" up!
Email Sea with your crafty ideas at
seana.j.vixen@gmail.com
and include your crafts name, supplies, either step by step pictures and/or finished product pictures and I'm sure that she'll be glad to post your idea too. 

SEA'S TWO CENTS: Yup! I'd be ecstatic to post one of your crafty ideas on our blog, and of course, I'll be sure to add a huge thank you to whoever sent me the idea. =^o^= Have a fab Memorial Day everyone, and be sure to give thanks to the men and women who served for our country.

Love,
July
And Seana =^o^=

Sunday, May 27, 2012

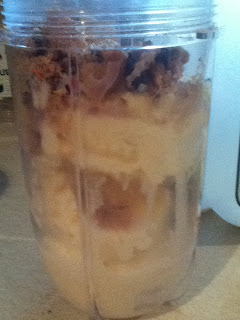
Cookie Milk Shakes

Hey everybody! This is July here! Yesterday I was actually supposed to post, but I didn't get a chance to do a real one.... so that's the reason that today's post is not a rebel post. Today's recipe is called Cookie Milk shakes.

You'll need:
four medium cookies of your choice
blender (I used a Magic Bullet)
vanilla ice cream
melk (THAT IS HOW YOU SAY MILK)

Sea's Two Cents: This sounds like a super yum recipe! But, viewers? Milk is pronounced just it like is spelled. Pay no attention to July's views on that. Milk is not spelled with an "e" therefore, it does not sound like an "e". Thank you for your consideration. =^o^=


This is what you're gonna do:


Crush your choice of cookies in a zip-lock bag

Scoop a few small scoops of ice cream into the
blender

Put the crushed cookies in the blender


Pour milk into the blender, not too much, just
enough to make the shake a little more
unsolid... if you know what I mean

Blend, pour into a cup and drink/eat/slurp
or whatever you do


This was a very good shake! If you've ever been to Steak and Shake and gotten their cookies and cream milk shake, it tastes just like that! YUMMMM!
Yesterday I mentioned that I'd be featuring a new thing on our blog and I'll have to tell you again tomorrow or something because, my dad is telling me to get off the laptop. Typical when I have something important to say right?
Love,
July

Saturday, May 26, 2012

Sorry


Hey guys, sorry I haven't been on my computer all weekend.... so I haven't posted. Well I can't any more tonight, but I promise I will post again tomorrow so don't panic! I've got some super recipes cooked up, a pasta dish and a milk shake, plus I'll tell you about a new thing that I'll be doing on this blog! I'll be posting tomorrow instead of today so just a head's up: tomorrow's post will not be a "Rebel Post'' since it's in place of today's.
July

Friday, May 25, 2012

Tree Decoration

Some of us, like myself, have no trouble coming up with random knick-knacks to stick on our walls (such as my magazine clippings). But others of you might need a little bit of help coming up with something that's cute, easy, and doesn't look over-the-top. So, here's a quick and easy way to create a tree decoration for your wall!

Whaddya Need?
- assortment of different colored buttons
-cloth/vinyl
-hot glue gun
OPTIONAL: paint

First, take a piece of either wood or thick paper and either paint it one color (we used tan in the example), or take the cloth you have and glue that down with your hot glue gun.

Next, you can either take more cloth or vinyl and cut it into the shape of a tree, or you can simply take some paint and paint the silhouette of a tree as well. (We used dark colors for the tree, so that it looked like the shape of a tree without being super detailed) Glue your tree shape on top of the either painted or clothed paper/wood.

Now, with your assortment of buttons, find ones that are similar in color. Like greens and blues together, reds and oranges, etc. Take whatever color group you're using and glue the buttons down around the branches of the tree to give your tree some leaves. If you used the red and orange color group, it'll give your tree a nice autumn twist. (:

And now, if you're really crafty, paint a little birdie nearby your finished tree decoration. VOILA! You've created a fun piece of artwork. (: ENJOY

^^^^
| | | |
That's our finished artwork! See how simple yet beautiful it looks? It's just very elegant looking, and I love our tiny birdie nearby! (:

<3 Seana


Wednesday, May 23, 2012

Braid Bun

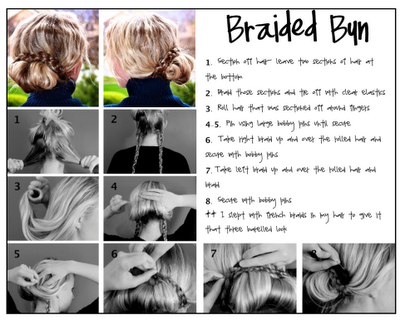
I know what you're all thinking: Golly, I really need to do something different with my hair today!
Solution: Braid bun!
Here's some quick and easy steps to create a new 'do for you! (:

Whaddya need:
Bobby pins
Hair spray (optional)


Sorry the words are so blurry. If the picture was any smaller, you couldn't see the words, they'd be tiny. So maybe you'll be able to figure it out by the pictures!

~Seana

Monday, May 21, 2012

Homemade Magnets


Hey guys! Take a look at my homemade magnets that you can make!
I have made them before and love them. I think they are very cool and its 
very fun and easy to make!
Note: I did not make these exact ones, but I have made them before. They are doing whatever it is that magnets do on my fridge, right now!


You will need:
Clear Gems 
Clear Tacky Glue
Magnets 
Sponge Brush 
Scraping Paper
Pen & Scissors 
Trace around the Gem 
Cut around the inside of the circle so the paper wont show

Put a glob of glue on the Gem

Smooth it out with the bush 
Place the paper on the Gem
Let it dry for a minute then place the magnet 
on the back of the paper
(Note: if you get the regular magnet with no adhesive attached 
just glue on the magnet to back to get same results)
And Walla you got a cute little magnet :)


If you want to be more creative you can use an 
Ink pad and fun little stamps to give it a more cuter look.
Just repeat steps from above to complete your magnet.


Aslo you can mix in letters as well to give it 
your own personal sayings


See its very easy and fun to make, if you babysit 
this would be a fun little craft that ya'll could do together. 
I hope you liked this idea and make some of your own!
July

Saturday, May 19, 2012

Peach Stack-up

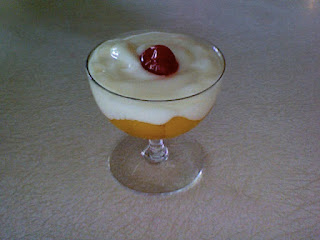
Hey guys! We've arrived back from camp and are back to our regular schedule for posting. Ok, I'm gonna get right to the point of this post because I still have a few chores to do before we eat dinner... so anyway, today I'm gonna teach you how to make Peach Stack-up! It is an extremely easy desert to make, and looks and tastes super good. I actually invented this recipe for my parents anniversary last year, and even though I'm not that good at making things, this is one thing that I'm able to make. I made it again this afternoon (so you get actual pictures from what I made) and it took me about five minutes to make one

Makes four Peach Stack-ups

You'll need: 
4 pretty little bowls that would completely fit a
peach half in the bottom

a 1/3 cup measure

Sorry the pictures with words are backwards... stupid camera
But you'll need 1  1/3 cups Vanilla yogurt total
so I would suggest a big container, not just a small one
like I had

4 peach halves total (note: you need halves, they work
and look better, but I have slices in mine)

4 cherries total


What you're gonna do:

Put on your Taylor Swift record and dance around
a bit to get the energy flowing


First you put the peach half in the bowl (hopefully
your's will look better than mine in this picture
because my mom used all the peach halves and left me
with slices...
Take my word for it, halves look much prettier


Put 1/3 cup yogurt on top of the peach or fill to
 the top of the bowl

Put a cherry on top and repeat the directions three more
times to make 4 Peach Stack-ups

Doesn't that look cute! Serve it anytime: for parties, dinners, or special occasions! This is my very own recipe and I hope you love it just as much as I do! It's very easy, with only four steps.
Savor this!
Peaches and Taylor Swift records,
July

Thursday, May 17, 2012

Rebel Post: Flip Flop Wreath

Why is this a rebel post, you might ask. Well, that's because July and myself will not be able to post something on Friday since we have a camp to go to and stuff. But since summer's just around the corner, I've devised a fab flip flop wreath for ya'll to try! Enjoy!

Whaddya need:
6-8 pairs of flip flops (depending on sizes you may need more or less)
Hot Glue Gun
Ribbon


Whaddya do:

First you want to separate your flip flops out. You want to use either all lefties or all righties for your wreath. You can essentially make two wreaths (which is what I did, I did an all lefts wreath and another with all of the right side shoes so that they wouldn't be wasted).


Next you want to lay out the flippey flops. Decide which colors and patterns you want beside each other. I ended up with several different sizes of shoes, so that was also a factor for me. I had to decide which sizes made the best shape.


Now you need to get your hot glue gun all heated up......


Next pick up a toe or heel of a flip flop and hot glue it down. Continue to glue your way around the wreath until all of the toes and heels have been glued together.


Lastly, tie some cute ribbon on and make a bow. I just made a double bow. I also made a loop on the back for a hanger. You can put it up on your door for a cute summer decoration.


<3 Seana

Wednesday, May 16, 2012

Bumble Bee Buddy


Hey ya'll! Sea here, with a fun little craft for you to do if you have younger siblings, cousins, or are babysitting some little kids. It's an easy craft, but a cute one.
(SORRY ABOUT POSTING THIS SO LATE TODAY!)

What you need:


  • One toilet paper roll
  • Card stock (yellow, black, white, flesh toned)
  • Scissors
  • Stapler
  • Glue
  • Markers


  • What to do:

    1. Take your yellow and black paper and cut nice thick strips. (Leave some black leftover for later usage.)

    2. Glue the strips of paper, going every other between yellow and black, onto the toilet paper roll, creating the striped look.

    3. While this is drying, you can cut a circle out of your tan colored paper for the bee's face. Using your markers, draw a nice little smiley face on the bee.

    4. Cut some antenna from the black paper that you saved from Step #1, and glue those to the BACK of the bee's face. Yes, the BACK. That way the ends don't show.

    5. Now, glue the face near the top of the side of the roll and let that dry.

    6. While that's drying, take your white paper and cut two wings. (For an easier way to cut it, fold the paper hot dog style and cut one wing, when you open it you'll have two, and you'll just have to cut down the fold to make them separate, or you can leave them whole.) Glue these wings to the back of the toilet paper roll same way as you did with the antennae.

    7. When this is all dry and beautiful, you'll have a wonderful little Bumble Bee Buddy to play with!

    Remember, if you do one of our crafts, recipes, or other funky things, send us an email with your picture on it, and we'll post it on our blog in one of our special "Something By You" post. And don't forget, if you have a fab recipe, craft, etc. we'd love to hear from you!

    seana.j.vixen@gmail.com
    julya.emmance@gmail.com

    Love and Bumble Bee Buddies,
    <3 Seana

    Monday, May 14, 2012

    Mr. Penguin Buddy Nails

    Hey, ya'll. Sea here, with a fun nail art idea! Here it is:


    Aww! The cutest thing ever, eh? I'll have more nail ideas coming soon, but for now, here's how we make our Mr. Penguin Buddies.

    Whaddya Need?
    For this project you will need:
    White, black, orange/yellow, and any other nail polish color.

    1. First, take any color that you'd like (except for white) and do a nice coat of polish on all of your nails. Make sure to do double-coats when working with a more watery type of nail polish, since that tends to be a bit thin. Let the polish dry.

    2. Now, take your white polish and paint a large oval onto your nails almost up the the tops of your nails by the skin, (you can do all of them, or you can go every other like in the picture shown above) and let it dry.

    3. Now the fun part! DECORATING! Whoop whoop. (: Alrighty, take your black nail polish and make two little dots near the top of the white ovals on all of the nails that you decided to penguin-ify.

    4. Next, you'll need your yellow or orange polish. Take the polish and make two half moons next to each other, leaving a bit of space between, on the bottom of the white part of your nails. Those are the feet of your penguin. For the nose, put your brush sideways to make it sort of a sideways oval, and dab a bit of polish below the eyes to make its lovely little beak.

    Once those beauties are dry, you'll have the most fab nails on the block! (: Enjoy your penguin-ified nails!

    <3 Seana

    July's own two cents: This is so so cute isn't it readers? If I tried that though, we would have nail polish all over the floor and all over the face and hands..... Not the best idea, huh? Send us pictures of your Mr. Penguin Buddies and we'll post them on our blog! (Sea and my email addresses are on the right side of our blog)

    Saturday, May 12, 2012

    Thanks wonderful readers!

    Hey guys! This is July, and we are now officially over 100 page views! You guys are great! This is all you who make our blog possible, without followers, no one to read, and no reason to post, but you who have been checking for new posts are awesome.
    Thanks so so much for reading faithfully,
    July 
    and Sea <3


    Sea's two cents:
    Whoop whoop! That's so exciting! 100 page views is a great accomplishment in the Creative Clique's bucket list. It's so awesome that you're all helping us make this blog the best it can be. (: We <3 our viewers!

    Mother's Best Strawberry Jell-o

    This is July here with our first recipe! Exciting, huh? We will try to make or show you a picture of the finished product. Sadly, I couldn't make this one today because we didn't have three boxes of Jell-o, but I did find you a picture.
    A Jell-o story:
    This is my mom's recipe actually! But anyway, every summer we go strawberry picking just for this Jell-o!

    This is what you'll need:
    3 small boxes of strawberry Jell-o
    3 1/2 cups water total
    1 pint of crushed strawberries (smash from whole)
    9x13 pan

    Boil 3 cups of water then add all the boxes of Jell-o
    stir until dissolved
    add crushed berries
    add another 1/2 cup water (stir) and put in a 9x13 pan and refrigerate

    Enjoy! I hope you make this because I LOVE this Jell-o....
    More crafts and recipes to come soon! Sorry to those of you with food allergies and restrictions and can't eat this.
    Strawberry Jell-o and Welsh muffins (I'll make those another time if they even exist!),
    July


    Friday, May 11, 2012

    Schedule

    Hey everyone! (: Glad you tuned in to the Creative Clique. I'm here to write July and myself's posting schedules so that you can anticipate those days with vigor. Haha. Anyways, here's what we decided on for now:


    Monday
    Wednesday
    Friday
    Saturday


    Now, some of these days might get a wee bit busy for us, so if you don't see a post that day, don't panic! We'll be back ASAP and hopefully get a post in for the next scheduled day. If something super duper important happens on a nonscheduled day, that's when we'll do a "Rebel" post. A post that goes against the schedule, like a rebel. (We'll title the post "Rebel Post:" and then add whatever title we would have normally given it if it was on a scheduled day.


    Bye for now,
    July & Seana

    Thursday, May 10, 2012

    2nd Post

    Here's to the 2nd post of the Creative Clique blog! Yippee! (By the way, this is Sea posting.)
    And I was looking for adorable little things to add to our wonderful blog for ya'll to enjoy, and I came across this, which I did NOT add.


    As odd as it is, this one just didn't seem to fit in with the theme I was going for. Sorry Mr. Fart Proudly, you don't earn a spot on this blog at the moment. If you'd like this on our blog, vote for it in the poll! (:
    <3 A very random Seana.
    PS: I think it'd be most awkward if I did end up putting it up there...very awkward indeed.


    Welcome!

    Hey guys,
    This is July
    julyaemmance.blogspot.com
    and Seana
    seanajvixen.blogspot.com
    here, and we want to welcome you to our new blog that we share! We're both pretty excited and we had a long IM debate about what the name of our blog should be. After much disagreeing and "um, no, no, no-ing" each other,  we finally decided on The Creative Clique! Don't let the title fool you though, we welcome all followers with open arms!


    While Sea J is busy decorating this lovely blog, I'm here writing our introductory post. So I'm sure you're all wondering what this blog is gonna be all about! Well we've decided on blogging all about crafts, recipes, and (the grand finale) OUR SHARED STORY that we will soon be writing!


    So sit back, relax, and enjoy the ride with us, and our craftiness!
    Lotsa love and neon ponies,
    Sea and July
    PS: Sea here adding her own two cents to this postie. First of all, we're so excited to be sharing a blog, and I'd be ecstatic if you would let us know if you like our fun little victorian theme I've devised for our blog! Feel free to let us know what you're thinking with comments or emails.
    seana.j.vixen@gmail.com
    julya.emmance@gmail.com


    We look forward to making you a part of our blogger buddies! ^_^